Showing posts with label 3. Production. Show all posts

Saturday, 23 April 2016

Completed Music Video, CD Booklet & Website

Our completed website can be accessed here and was created using the free website builder called Wix.


All of the images for the CD front cover, reverse and booklet can be viewed below.


This is our completed music video.


Friday, 25 March 2016

Friday, 11 March 2016

Making The Website

Over the past few weeks we have been creating a website as an ancillary task to accompany the video and the CD cover.

We decided to use the webpage creator Wix to get the best possible design for our website. We chose a template which had a similar look to what we were hoping to make and began to edit. This was the original template's home page which appeared to need a lot of work to change. Firstly, we needed to change the background to something more appropriate to our project (which would feature on all of the pages that follow) after several different backgrounds were tested, we opted for a scenic screen capture from our video which we then had to edit so that the lighting and colours allowed for text to be viewed. We also removed the large icon and text from the centre and replace it with a large title of our artist to be placed at the very top of the page. The social media links were also moved and were each linked to Madeon's official pages.
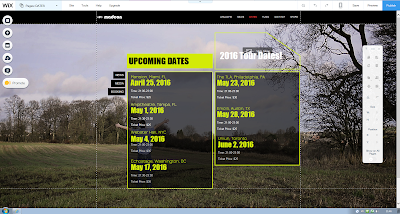
The navigation buttons at the bottom were only added to this page whilst the ones at the top remained in the header on the rest of the pages.


The News page was fairly straight forward in terms of the design. We simply split the text box which scrolled down the page into two parts in order to have everything instantly seen without the need to scroll down as this affected the size of the background picture. Once we had finished doing that, we were able to fill in the information with events including the plan for the music video and the release of the song we were covering. We also decided at this point to colour code each page, making the boxes red throughout as opposed to the flashing multi-coloured ones that were originally there.


We did a followed a near identical process for the news page, splitting the text box and adding in information about a tour including dates, location and price.


For the music page, we had to replace the music app that already existed and opted for YouTube clips with links to the same songs on iTunes.  We had originally had 4 videos on the page, however due to the aspect ratio on certain computers, not all could be viewed properly.
We decided to completely scrap the bio page as it was not vital to the website and it didn't seem to blend very well with the other content.


We created our own brand new Store page which frequently features on real artists' websites selling merchandise etc. We added images of genuine Madeon merchandise and made some realistic prices to acconpany them.


The header contains the Artist's title alongside the logo From the initial 'M'. This logo is also a button that links directly to the homepage.

Wednesday, 9 March 2016

Shoot Plan & Mise-En-Scene of Album Artwork

As we began filming, we took into consideration the house style of the entire project. We discussed that it would be best to have the artwork and the website be in a similar style to the music video. We came across a metal gate (which had obviously had something strike it) so we used that as a base for the front and back cover.

As we picked the dates to film the music video, we decided we would use certain shots from the film to use in the artwork. We particuarly emphasised on the mise en scene and the proxemics of the characters. We chose the brighter looking shots to use for the postive protagonist whereas we used negative shots to use for the negative character. This was done with the lighting from each shot and the cinema style effects which were used in Photoshop to make the different characters different within each image of the album artwork. In addition to lighting and effects. We also tried to make the sky more visible in the postive characters images rather than the negative one to promote the sence of isolation within those images.


Sunday, 6 March 2016

Green Screen Practice

Today we practiced the use of editing with green screens. As a result, we used the colour key in Premiere Pro to create this.

Saturday, 5 March 2016

Editing & Effects Practice


We have been testing and playing around with various effects both from the Premiere Pro program itself and from 3rd party sources such as RampantMedia which we got the glitch/grunge effects from which we have practiced in the video above.

The effects were available with this YouTube instructional video which gave us instructions on how to make the effects work well with the video it affects. In the effects package, we received 4k resoultion clips which we placed over clips and then change the settings little by little and to tweak the footage in order to give the best possible outcome with the effects overlaying the video.

The instructional video we used is below and it walked through how to do everything in a simple way.

Thursday, 25 February 2016

Editing The Music Video & Feedback

We have almost finished editing the music video for our project. We have all the clips placed in the sequence timeline and have begun the rigorous process of adding effects to make the video perfect in every aspect.


In order to achieve the best transitions and effects in the video, we ended up placing clips into a total of 5 different video tracks across the course of the video to be able to make the transitions flow and the effects to be enhanced during the transitions.


The amount of effects we are able to use on Premiere Pro is huge and with that we have the freedom to pick and choose as we feel and that the chances of finding an effect which enhances the picture in the way that we want is high.


In addition to this, I have began requesting feedback on the current edit of the video from various people I know.


This was the current edit of the music video which I have shown people and they have responded accordingly:


I have begun using the feedback from these comments and the comments of my other classmates and my teacher in order to make sure the video is of highest quality.


One of the comments which I have acted upon mostly was that the video included too many fades as transition and that the difference between characters emotions weren't always obvious. Through this I have removed fades and have been using various effects to make the difference in characters emotion obvious with the use of luma keying and reducing the brightness in the depressed characters shots and the use of colour changing, colour correction, enhancing the brightness and saturation and using sharpening effects on some shots to make the emotions of the happy character evident.

Saturday, 20 February 2016

Filming Days 4 & 5 (13-14/02/16)

We filmed for both Saturday and Sunday in order to film the remaining shots to finish the music video and to shift our project into the post-production stage. We filmed on the Saturday all the remaining shots on our storyboard for the break, build-up and both drops in the song in order to have enough footage to complete the video. On the Sunday we filmed extra shots in case some of the shots we recorded on previous days were useless. The shooting schedule for Saturday is here and for Sunday it is here.


We used the schools booking system again to make sure we had all the equipment necessary to record our music video.


Friday, 19 February 2016

Contributor Release Forms

In order to film our music video, we had to sign the release form in order to ensure all the credit for creating the music video. Brad's form, Matt's form and my form are all available on Google Drive. The terms of our release forms are:


Wednesday, 17 February 2016

Creating The CD Booklet & Album Artwork

I began designing the artwork for the CD booklet and cover in early February and since then I have progressed a lot on the artwork for the booklet and cover.


I have been going into detail on photoshop to make sure all the colours were exactly how I wanted them to be.


At times, I was changing the colours pixel by pixel to make sure the colours were as precise as I had wanted.


In addition to colour correction with the artwork especially. I began using various effects which Photoshop offers such as gradient changing, brightness and vibrance altering, photo filtering, changing the colour curves of the image and many more. I did this to make sure that all the images had a warm effect on them and to give them the slight sunset tint to each image in order to make the image look effective to the audience.


It also required a lot of time to superimpose the text of the front and back covers to the signs which I pictured when I was out recording the music video.


The content in the booklet was relatively similar to the artwork in the use of effects to make the image have a warm effect. In addition, the CD booklet content had to contain small text in order to fill all the vocals from one song on the page. In order to achieve that I used the stroke effect to give a white outline of the black text making it easy to read whilst it being small.


Using Adobe Illustrator I was able to begin piecing each part of the booklet together on a template which makes it ready to print in the size required to fit inside a CD case.


From the images we took when filming of some signs attached to a broken gate, we were able to create the idea for our front and rear covers for our album. With the effects and techniques above, we were able to create the front and rear covers different to its original sourced image. With the rear cover especially, it took time in order to remove the reflection of the sun from the image to make sure the rear cover was perfect.

Wednesday, 10 February 2016

Risk Assessment For Filming The Music Video

We filled out a risk assessment form to assess the dangers that existed when we were filming for our music video. From what we found out for the location scout of for the music video, we were able to accurately distinguish the dangers that were there when we were filming and we came to the conclusion that the risk of injury (minor injuries in particular) were trivial.


Thursday, 4 February 2016

Copyright Request


We decided to email the management for Madeon in a hope that we are granted the rights to use the song in our music video. We are using the song for educational purposes and for non-profit purposes so we hope that they respond giving us the legal rights to use the song in this way.

Tuesday, 2 February 2016

Filming Day 3 (30/01/16)

We continued filming this weekend on the Saturday only due to illness cancelling the Sunday recording session. We have the shooting schedule for Saturday here.

Today we planned to record all the lip syncing shots in order to get a basis of what we need to record after to place in the gaps of the video. We recorded most of the lip syncing shots (and also made Brad very cold and murderous) in this recording session. This day was very productive as we were able to record the lip syncing shots with the aid of our storyboard. All we need to record now is the storyboarded shots for the video during the break, buildup, drop and outro of the song.


Again we used the schools booking system to ensure we had all the equipment necessary to continue filming our music video.


Tuesday, 12 January 2016

Filming Days 1 & 2 (09-10/01/16)

We began filming this weekend on the Saturday and the Sunday. We have the shooting schedule for Saturday here and the schedule for Sunday here. We did have some technical issues which led us to cut filming early on the Saturday, however we caught up with our schedule by shooting more footage on the Sunday.

In the recording we did do, we decided to focus on the introduction and ending of our music video so we could create a foothold on recording the music video as a whole. We have been using our storyboard to aid us in which shots to record and for how many bars in the song it will be recorded for.


We booked our equipment from the schools booking site and we hired the camera and the tripod for the weekend.